How to create models in XSI and other 3D applications and make them work in Battlefront 1 & 2. Post models, tips for application usage and share anything XSI, 3DMax, SketchUp, etc.
lucasfart wrote:Are these maps a lot more resource-intensive then only applying stock textures?
Well that depends on your certain point of view. In order to see bump or normal maps, you have to use High light settings, which are more resource intensive.
When I used XP, some maps had extremely poor performance on high lighting, even with my HD 5850.
Now I use Windows 7 and it finally runs perfectly on highest settings with maximum AA.
He probably wasn't using Dropbox at the time, since he used Imageshack. A shame, only DUCK would have them most likely and he isn't around much anymore.
At least the tutorial information is still valid even without examples. Or one can just play RAS Prosecutor to see the references.
I really hate bumping this topic but the images still don't work. I wouldn't mind taking some screenshots from this map so an Admin could replace them in DarthD.U.C.K's first post. I just would like to know if someone would edit his first post here for an image replacement.
AceMastermind wrote:Fixed all images except for the specmapexplanation.png
His description of the image if you want to recreate it:
This is an example of the specular map for the stock chaingun texture and its effect ingame:
Wow thanks Ace. I believe he was referring to the stock chaingun texture from the assets and its specular effect ingame. Just let me take some Screenshots. I am going to link them here for you.
Thanks again, Ace.
The stock chaingun texture doesn't have a specular map texture nor does the stock chaingun model have specular enabled. He was referring to a custom specular map texture that he created for the stock chaingun and how it looks in-game on a model using the stock chaingun texture with specular enabled. I'll try to post the example and screenshot.
EDIT
Here it is:
Hidden/Spoiler:
First post updated with new image. Is it just me or are the other images still not working?
AQT wrote:Is it just me or are the other images still not working?
No it was me too, I don't know what happened between today and yesterday. I reset the share permissions and they are back now, see if they're still broken for you, if so i'll upload them somewhere else.
On shadowvolumes, how does one go about making one for a unit from an already-textured and enveloped mesh? Would I create a duplicate version, lower the polygon count and remove all texture assignments on that mesh/ If so, how do I go about doing that last step?
duplicate the msh, don't forget to freeze M. Next steps:
modify poly. mesh>poly reduction > play around with sharpness and preserve volume, too.
Freeze M
Explorer>expand the poly mesh>select the material>klick delete
Freeze M
If you want you can delete under Clusters the UVing, too. But you needn't.
DarthD.U.C.K. wrote:Bump/Normal and Specularmap
Not much explanation needed, its a combination of both bump/normal and specularmap
Creation:
The specular map needs to be put in the bump map's alpha channel. To do this, open the bump map in your favourite image editing application, apply a mask to the bump map and copy the specular map in the mask.
Integration:
To normal/bump and specularmap a surface, apply the rendertype "28".
In the "texture 1" slot insert the name of the bump/normal map with .tga extension.
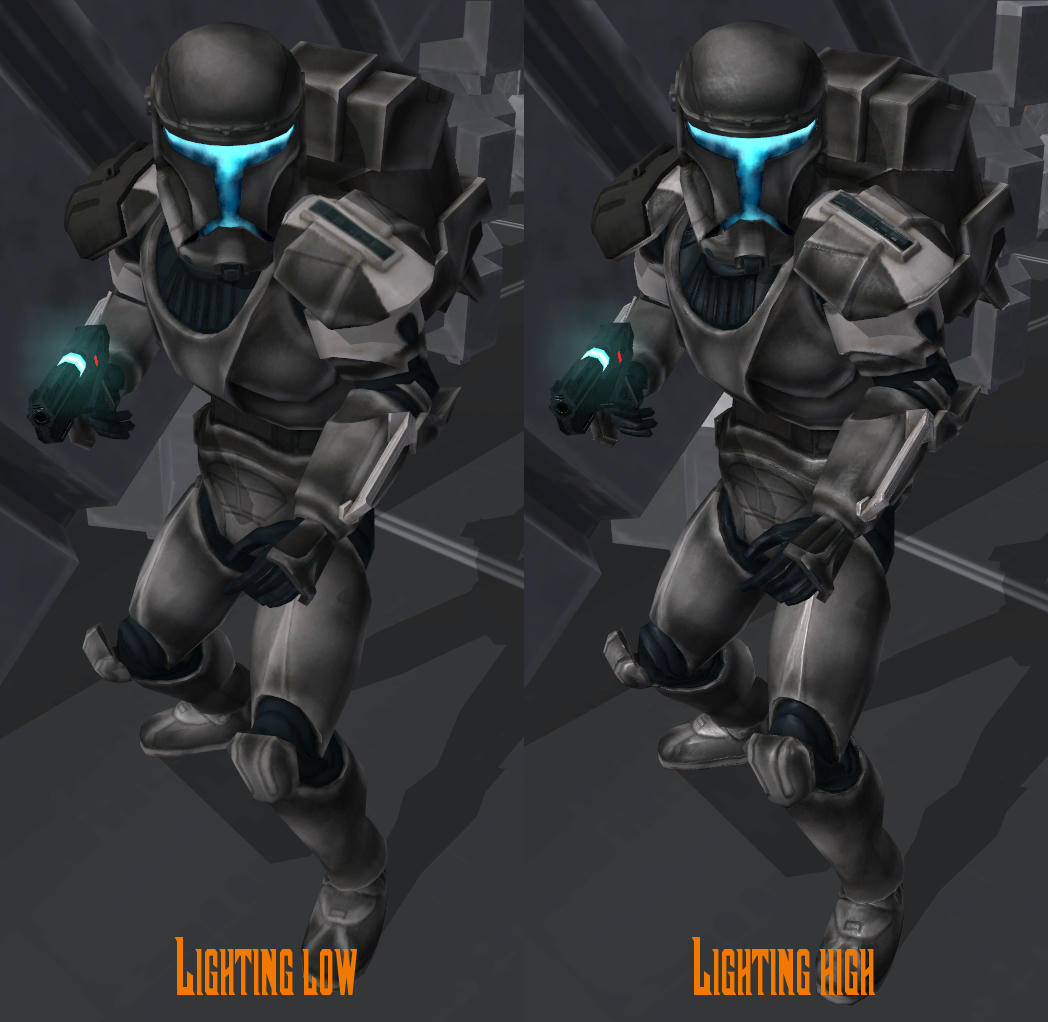
You need to have your lighting setting on high to see the bump map.
If you have your lighting setting on medium this flag will be interpreted as specular map flag. This means that you also have to put the specular map in the diffuse texture's alpha channel if you dont want people who play on lower settings to see your model looking all plasticy.
In order to make the specular map show up, your map requires a directional light that has "Cast Specular" enabled.
Example:
Here is the Clone Commando without and with specular and normal map, I didn't have the white Commando in the map so I had to take this one which makes the normal map not that recognizeable:
Hidden/Spoiler:
It's worth noting that you'll get the best results if you apply the specular map to the alpha channel of the normal/bump map as well as the alpha channel of the diffuse map. This is pointed out in the documentation:
Render Type: Render Bumpmap+Glossmap (Rendertype #28) Data 0: NOT USED Data 1: NOT USED Texture 0: diffuse texture (gloss map in alpha channel) Texture 1: bump map texture (gloss map in alpha channel)
Description:
A bump mapping object with specular is useful for shiny surfaces (such as metal) with groves where you want the groves to be highlighted. The gloss map is useful to give the surface an uneven shine.
Comments: In order to adjust the specular power associate the selected polygons with a XSI Phong material. The color of the material effects the specular color and the specular decay controls how big the specular spot is. The larger the specular decay the smaller the spot will be.
Like, it'll still work with the specular map only in the normal/bump map's alpha channel, but it'll look best when it's in the alpha channel of both the diffuse and normal/bump map.
I can post example images comparing them if needed/desired.